DocuSign API Guide: Features, Authentication, Integration, Examples And 4 Competitive Comparaison

Introduction to the DocuSign API
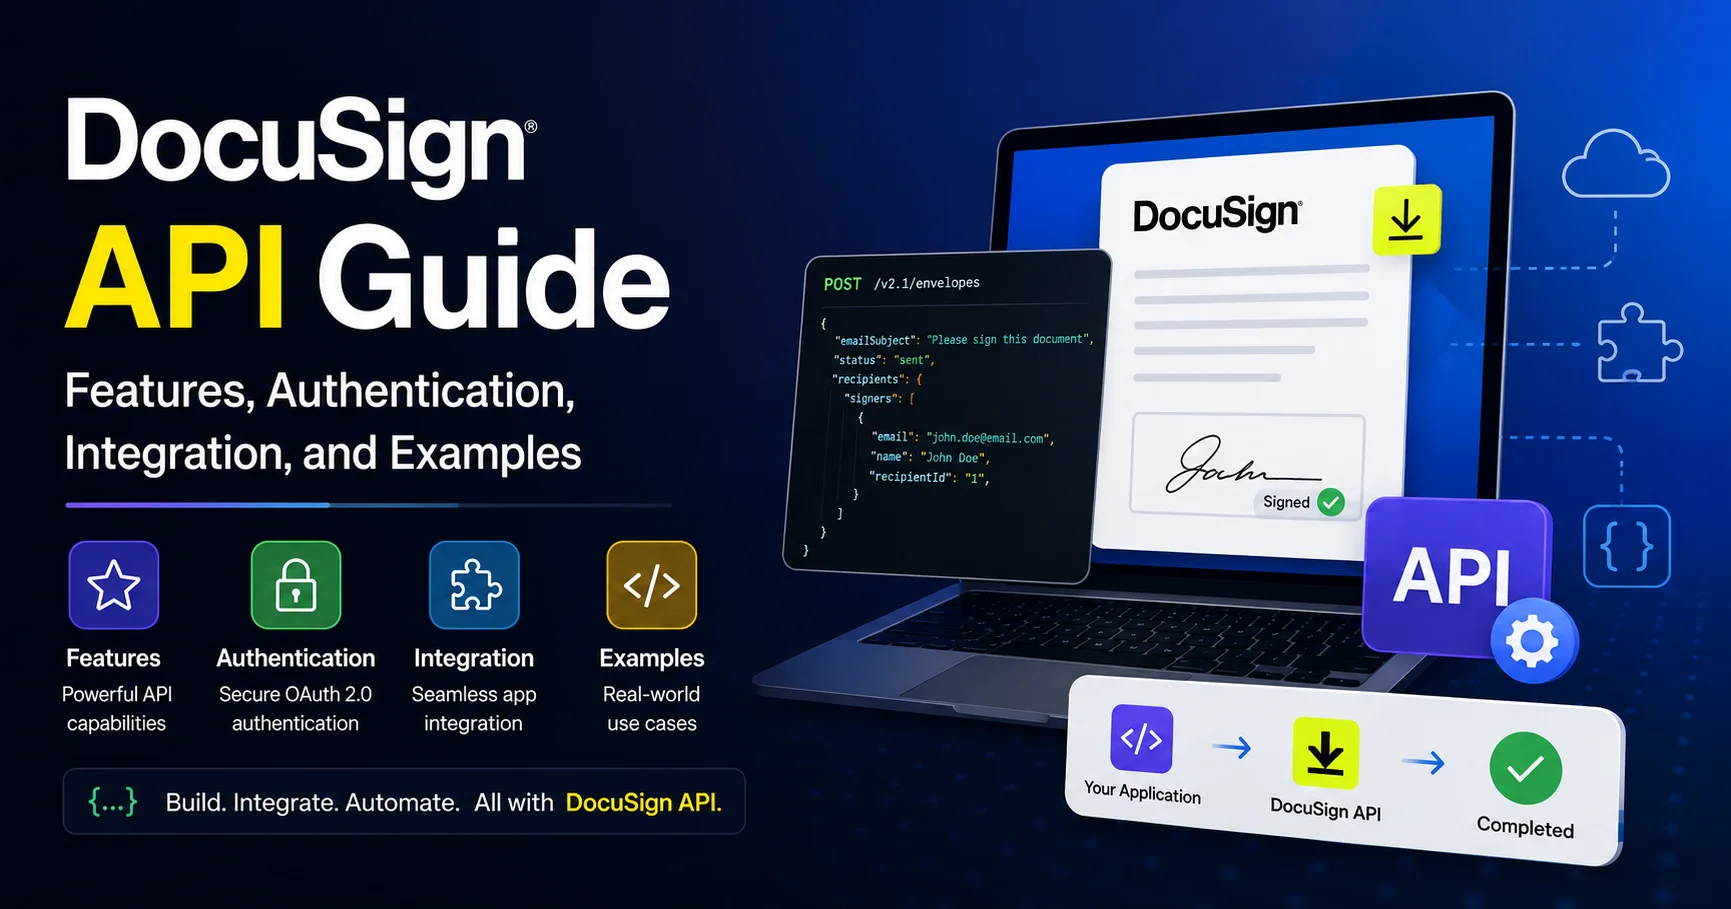
The DocuSign API is a powerful developer tool that enables businesses to integrate electronic signature capabilities directly into their websites, applications, and automated workflows. Instead of requiring users to leave an application to sign documents, developers can use the API to create envelopes, send documents for signature, track signing progress, and retrieve completed agreements programmatically.
With support for features such as embedded signing, document management, authentication, templates, and real-time status updates, the DocuSign API can help organizations automate contract and agreement workflows while reducing manual paperwork. It is particularly useful for applications that need secure, scalable, and legally recognized electronic signature functionality.
Whether you are building a CRM, HR platform, financial application, SaaS product, or internal business system, understanding how the DocuSign API works can help you create faster and more efficient digital document workflows.

Quick Answer: The DocuSign API — primarily the eSignature REST API — gives developers programmatic control over the entire document signing lifecycle: creating envelopes, placing signature fields, sending to recipients, tracking status in real time, and retrieving signed documents. It supports OAuth 2.0 authentication, webhooks for event-driven workflows, and has official SDKs for Python, Node.js, Java, C#, and PHP. Used by over 1.5 million developers worldwide, it’s the industry standard for embedding legally binding e-signatures into any application.
If you’ve ever watched a business deal stall because someone had to print, sign, scan, and email a document back — you already understand the problem the DocuSign API solves. I’ve integrated it into CRM systems, loan origination platforms, HR onboarding tools, and real estate workflows, and each time the impact is the same: what used to take days collapses into minutes, and the audit trail is bulletproof.
But the DocuSign API has a steeper learning curve than most developer APIs. The authentication setup alone trips up a surprising number of experienced engineers. The envelope model, tab types, and webhook configuration all have nuances that the official docs don’t always explain in plain English.
This guide does.
Here’s exactly what you’ll find:
- A clear explanation of what the DocuSign API actually is and how it’s structured
- Step-by-step authentication setup (OAuth 2.0 — both flows)
- Creating and sending your first envelope with code examples
- Advanced features: templates, embedded signing, webhooks, and bulk send
- DocuSign API vs. competing e-signature APIs — honest comparison
- Pricing breakdown for 2026
- Common pitfalls and how to avoid them
- FAQs from real integration experience
Let’s eliminate the confusion and build something that works.
What Is the DocuSign API ? Structure and Core Concepts
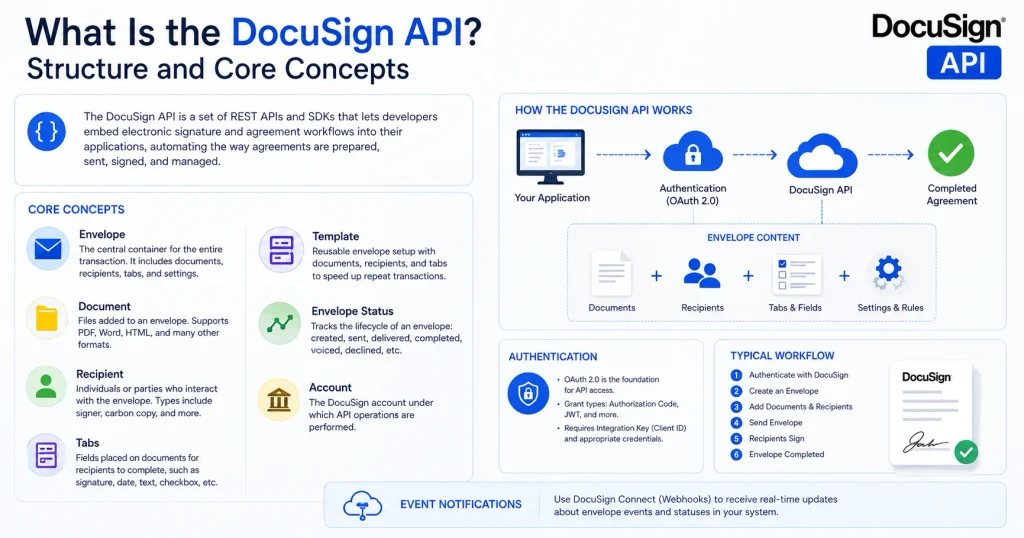
The DocuSign API is a set of REST APIs and SDKs that allows developers to integrate electronic signatures and agreement workflows directly into websites, mobile applications, CRM platforms, and business systems. Instead of requiring users to manually open DocuSign and upload documents, applications can programmatically create, send, track, and manage signing transactions.
The DocuSign API is a suite of REST APIs published by DocuSign that enable developers to integrate electronic signature and agreement automation capabilities directly into their own applications. It’s not a single API — it’s a family of APIs, each serving a distinct purpose:
| API | Purpose |
|---|---|
| eSignature API | Core signing workflows — create, send, manage envelopes |
| Click API | Clickwrap agreements (terms of service, consent forms) |
| Rooms API | Real estate transaction management |
| Monitor API | Security and compliance event monitoring |
| Admin API | Organization-level user and account management |
| Navigator API (2024+) | AI-powered contract intelligence and extraction |
For the vast majority of developers, the eSignature API is the one you need. Everything else in this guide focuses on it, because that’s where 95% of real-world DocuSign API integrations live.
Core Concepts You Must Understand First
Before writing a single line of code, these three concepts need to be clear in your head. Skipping this mental model is the number one reason DocuSign integrations get confusing fast.
1. Envelopes
An envelope is DocuSign’s container for a signing transaction. It holds your documents, defines your recipients, specifies where signatures go, and tracks the entire workflow. Every signing request starts with creating an envelope.
2. Recipients
Recipients are the people who interact with your envelope. DocuSign supports multiple recipient types:
- Signer — must sign the document
- Carbon Copy (CC) — receives a copy but doesn’t sign
- Certified Delivery — must view the document but doesn’t sign
- In-Person Signer — signs on a device in your presence
- Editor — can add or modify fields
3. Tabs
Tabs are the interactive fields placed on your document — signature fields, initials, dates, text inputs, checkboxes. They’re positioned using coordinates relative to the document page. Getting tab placement right is one of the trickier parts of the DocuSign API, and I’ll cover it with examples.
📊 Industry Scale: DocuSign processes over 1 billion transactions per year across more than 180 countries. The DocuSign API is used by developers at organizations ranging from solo SaaS founders to global financial institutions. (Source: DocuSign Company Overview)
DocuSign API Authentication: OAuth 2.0 Explained Clearly
Authentication is a fundamental part of integrating the DocuSign API. Before an application can create envelopes, send documents, retrieve signing information, or perform other API operations, it must obtain a valid OAuth 2.0 access token. DocuSign currently recommends three OAuth grant approaches: Public Authorization Code Grant, Confidential Authorization Code Grant, and JSON Web Token (JWT) Grant. (Docusign Developer Center)
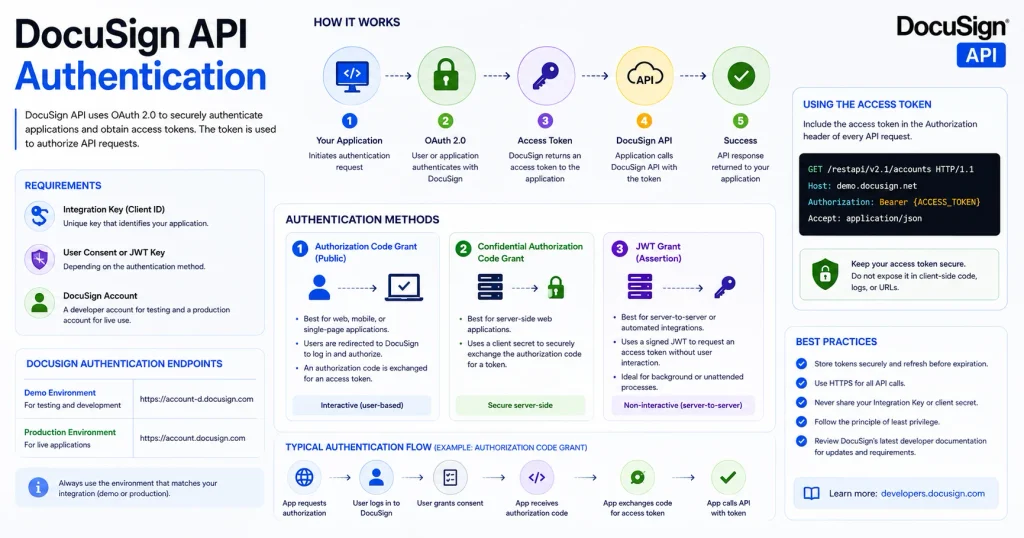
Authentication is where most DocuSign API integrations hit their first wall. DocuSign uses OAuth 2.0 exclusively — no simple API key authentication like you might expect. There are two flows, and choosing the wrong one for your use case causes real problems.
How DocuSign API Authentication Works
The basic authentication flow is:
Your Application → OAuth 2.0 → Access Token → DocuSign API → API Request
The application first authenticates and obtains an access token. That token is then included in the HTTP Authorization header when making API requests. (Docusign Developer Center)
Main Authentication Methods – DocuSign API
| Method | Best suited for | Key characteristic |
|---|---|---|
| Authorization Code Grant | Applications where users interact with DocuSign | User authorizes the application |
| JWT Grant | Server-to-server or automated integrations | Suitable for unattended API operations |
| Confidential Authorization Code Grant | Secure server-side applications | Uses a client secret on the backend |
DocuSign’s developer resources provide Quickstart projects and code examples for both Authorization Code Grant and JWT Grant, making them practical starting points for developers. (Docusign API Developer Center)
Integration Key and Client Credentials – DocuSign API
When creating an API integration, developers work with an Integration Key, also referred to as the Client ID. Depending on the authentication method, the application may also use a client secret or other credentials. DocuSign recommends creating a developer account for development and testing, then using the appropriate production integration credentials when moving an integration live. (Docusign Developer Center)
OAuth 2.0 Access Tokens
After successful authentication, DocuSign API issues an access token. Your application uses this token to authorize API calls. For example, an API request typically includes:
Authorization: Bearer {ACCESS_TOKEN}The access token should be treated as a sensitive credential and should never be exposed in client-side code, public repositories, or URLs.
Choosing the Right Authentication Method – DocuSign API
For a web application where each user needs to authorize access to their DocuSign account, Authorization Code Grant is generally the appropriate approach.
For a backend service that needs to perform DocuSign operations automatically without requiring a user to repeatedly sign in, JWT Grant can be a better fit, subject to the required consent and configuration.
The key is to choose the OAuth flow based on who is authorizing the application and whether the integration needs interactive or unattended access.
For the latest authentication requirements, implementation details, and code examples, consult the DocuSign Developer Center. (Docusign Developer Center)
The Two OAuth Flows
1. Authorization Code Grant — For User-Context Applications
Use this flow when your application acts on behalf of individual users who have their own DocuSign accounts. The user authorizes your app through a DocuSign API login page, and you receive an access token tied to their account.
Best for: SaaS platforms where each user has their own DocuSign account and wants to send from their own identity.
2. JWT Grant (JSON Web Token) — For Service/Backend Applications
Use this flow when your application needs to act on behalf of users without requiring them to log in to DocuSign every session. Your application uses a private RSA key to generate a JWT, which is exchanged for an access token.
Best for: Automated workflows, backend systems, bulk processing — any situation where human DocuSign login isn’t practical.
In practice, the JWT Grant is what most server-side integrations need. Here’s the setup:
Setting Up JWT Authentication (Step by Step)
Step 1: Create a DocuSign Developer Account
Go to developers.docusign.com and create a free developer sandbox account. This gives you a full DocuSign environment to test against without real signatures or billing.
Step 2: Create an Integration Key (App)
- Log into your developer account at the DocuSign Admin Demo portal
- Navigate to Settings → Integrations → Apps and Keys
- Click Add App and Integration Key
- Name your app
- Under Authentication, select Service Integration (JWT)
- Generate an RSA keypair — DocuSign generates the public key; you download and store the private key
Step 3: Consent Grant
Before JWT auth works, the user (or admin) whose account you’ll send from must grant consent to your integration. Navigate this URL once in a browser:
https://account-d.docusign.com/oauth/auth?
  response_type=code&
  scope=signature%20impersonation&
  client_id=YOUR_INTEGRATION_KEY&
  redirect_uri=YOUR_REDIRECT_URI
After granting consent, you never need to do this manually again — your backend handles token acquisition automatically.
Step 4: Acquire Access Token via JWT (Python)
import jwt
import time
import requests
import base64

def get_docusign_token(integration_key, user_id, private_key_path, account_id):
    """Generate JWT and exchange for DocuSign access token."""

    with open(private_key_path, 'r') as key_file:
        private_key = key_file.read()

    # Build JWT payload
    payload = {
        "iss": integration_key,
        "sub": user_id,           # DocuSign User ID (GUID) of the sending user
        "aud": "account-d.docusign.com",  # Use account.docusign.com for production
        "iat": int(time.time()),
        "exp": int(time.time()) + 3600,
        "scope": "signature impersonation"
    }

    # Sign the JWT with your RSA private key
    encoded_jwt = jwt.encode(payload, private_key, algorithm="RS256")

    # Exchange JWT for access token
    token_url = "https://account-d.docusign.com/oauth/token"
    response = requests.post(token_url, data={
        "grant_type": "urn:ietf:params:oauth:grant-type:jwt-bearer",
        "assertion": encoded_jwt
    })

    token_data = response.json()
    return token_data["access_token"]
⚠️ Critical Security Rules for DocuSign API Authentication
- Never commit your RSA private key to Git. Store it as an environment variable or in a secrets manager (AWS Secrets Manager, Azure Key Vault, HashiCorp Vault).
- Never hardcode your Integration Key or User ID in source code.
- Rotate tokens properly: Access tokens expire after 1 hour. Build token refresh logic before your application goes to production, not after it starts failing.
- Use the sandbox (
account-d.docusign.com) for ALL development and testing. Never point dev code at production endpoints.
Creating Your First Envelope: A Complete Code Example
With authentication sorted, you’re ready to create and send a signing request. Here’s a complete, working example using the DocuSign Python SDK:
Install the SDK
pip install docusign-esignSend a Document for Signature
from docusign_esign import ApiClient, EnvelopesApi, EnvelopeDefinition
from docusign_esign import Document, Signer, SignHere, Tabs, Recipients
import base64
import os

def send_envelope_for_signature(access_token, account_id, signer_email, signer_name):
    """
    Create and send a DocuSign envelope with a PDF document.
    """

    # Step 1: Configure the API client
    api_client = ApiClient()
    api_client.host = "https://demo.docusign.net/restapi"  # Sandbox
    api_client.set_default_header("Authorization", f"Bearer {access_token}")

    # Step 2: Load and encode your document as Base64
    with open("contract.pdf", "rb") as pdf_file:
        pdf_content = base64.b64encode(pdf_file.read()).decode("utf-8")

    # Step 3: Create the Document object
    document = Document(
        document_base64=pdf_content,
        name="Service Contract",
        file_extension="pdf",
        document_id="1"
    )

    # Step 4: Define the signer
    signer = Signer(
        email=signer_email,
        name=signer_name,
        recipient_id="1",
        routing_order="1"
    )

    # Step 5: Place a signature tab on page 3, position x=200, y=400
    sign_here = SignHere(
        document_id="1",
        page_number="3",
        recipient_id="1",
        tab_label="SignHereTab",
        x_position="200",
        y_position="400"
    )

    # Step 6: Attach tabs to signer
    signer.tabs = Tabs(sign_here_tabs=[sign_here])

    # Step 7: Build the envelope definition
    envelope_definition = EnvelopeDefinition(
        email_subject="Please sign your Service Contract",
        documents=[document],
        recipients=Recipients(signers=[signer]),
        status="sent"  # "sent" sends immediately; "created" saves as draft
    )

    # Step 8: Send the envelope
    envelopes_api = EnvelopesApi(api_client)
    result = envelopes_api.create_envelope(account_id, envelope_definition=envelope_definition)

    print(f"Envelope sent! Envelope ID: {result.envelope_id}")
    print(f"Status: {result.status}")
    return result.envelope_id
This single function handles everything: document encoding, recipient configuration, tab placement, and transmission. Within seconds of calling it, your signer receives a DocuSign email with a link to sign your document.
Understanding Tab Positioning
Tab positioning is one of the most common pain points with the DocuSign API, and it deserves a direct explanation.
Tabs are positioned using pixel coordinates relative to the bottom-left corner of the page. The X axis goes right; the Y axis goes up. This is the opposite of how most web developers think about coordinates (where Y increases downward).
Practical tips for getting positioning right:
- Use DocuSign’s Template Builder in the web UI to visually place tabs, then query the template via API to get the exact coordinates — this saves enormous time
- For dynamic documents where page content shifts, use anchor tabs instead of fixed coordinates:
sign_here = SignHere(
    anchor_string="/signature_here/",  # Must appear in your PDF
    anchor_x_offset="0",
    anchor_y_offset="0",
    anchor_units="pixels"
)
Anchor tabs search for a text string in your document and position the tab relative to where that string appears. This is far more reliable for documents generated from templates where field positions may shift slightly.
Using DocuSign Templates: The Smart Way to Scale
If you’re sending the same document type repeatedly — employment contracts, NDAs, purchase agreements — building the envelope from scratch every time is wasteful and error-prone. DocuSign Templates let you define the document, fields, and roles once in the DocuSign UI, then instantiate them via API with just a template ID and signer details.
from docusign_esign import TemplateRole

def send_from_template(access_token, account_id, template_id, signer_email, signer_name):

    api_client = ApiClient()
    api_client.host = "https://demo.docusign.net/restapi"
    api_client.set_default_header("Authorization", f"Bearer {access_token}")

    # Define who fills each role in the template
    signer_role = TemplateRole(
        email=signer_email,
        name=signer_name,
        role_name="Client"  # Must match the role name defined in your template
    )

    envelope_definition = EnvelopeDefinition(
        template_id=template_id,
        template_roles=[signer_role],
        status="sent"
    )

    envelopes_api = EnvelopesApi(api_client)
    result = envelopes_api.create_envelope(account_id, envelope_definition=envelope_definition)
    return result.envelope_id
That’s it. A 20-line function that sends a fully configured document with all fields pre-positioned, all routing logic pre-defined, and all email templates pre-customized. Templates are the feature that makes the DocuSign API genuinely scalable for high-volume use cases.
Embedded Signing: The In-App Signing Experience
By default, DocuSign sends signers an email with a link that opens DocuSign’s own signing interface. For many use cases, that’s perfect. But if you want signers to sign without leaving your application — no email, no DocuSign branding, just your UI — you need embedded signing (also called Focused View or embedded recipient view).
from docusign_esign import RecipientViewRequest

def create_embedded_signing_url(access_token, account_id, envelope_id,
                                 signer_email, signer_name, client_user_id):
    """
    Generate a signing URL that embeds the DocuSign UI inside your application.
    client_user_id must match what was set when the envelope was created.
    """

    api_client = ApiClient()
    api_client.host = "https://demo.docusign.net/restapi"
    api_client.set_default_header("Authorization", f"Bearer {access_token}")

    view_request = RecipientViewRequest(
        authentication_method="none",
        client_user_id=client_user_id,  # Unique ID for this signer in your system
        recipient_id="1",
        return_url="https://yourapp.com/signing-complete",  # Redirect after signing
        user_name=signer_name,
        email=signer_email
    )

    envelopes_api = EnvelopesApi(api_client)
    result = envelopes_api.create_recipient_view(account_id, envelope_id,
                                                  recipient_view_request=view_request)

    # Embed this URL in an iframe or redirect the user to it
    print(f"Signing URL: {result.url}")
    return result.url
Important: The returned URL expires after 5 minutes. Generate it on-demand just before presenting it to the user — never generate it in advance and store it.
Embed the URL in an <iframe> in your application for a seamless in-app signing experience:
<iframe
  src="{{ signing_url }}"
  width="100%"
  height="800px"
  frameborder="0"
  title="Document Signing">
</iframe>
DocuSign Webhooks: Real-Time Event Notifications
Polling the DocuSign API to check envelope status is inefficient and slow. The right approach is webhooks — DocuSign sends HTTP POST notifications to your server the moment anything changes: envelope sent, viewed, signed, declined, voided.
Setting Up a Connect Webhook
DocuSign calls their webhook system Connect. You configure it in the DocuSign Admin interface or programmatically via the API.
Your webhook endpoint must:
- Accept POST requests with a JSON or XML payload
- Return HTTP 200 within 10 seconds
- Be publicly accessible (use ngrok for local development testing)
Here’s a minimal Flask webhook handler in Python:
from flask import Flask, request, jsonify
import json

app = Flask(__name__)

@app.route('/docusign/webhook', methods=['POST'])
def handle_docusign_event():
    """Handle incoming DocuSign Connect webhook notifications."""

    payload = request.json

    envelope_id = payload.get('envelopeId')
    status = payload.get('status')
    event_type = payload.get('event')

    print(f"Envelope {envelope_id} - Event: {event_type} - Status: {status}")

    # Handle specific status changes
    if status == 'completed':
        handle_signing_complete(envelope_id, payload)
    elif status == 'declined':
        handle_signing_declined(envelope_id, payload)
    elif status == 'voided':
        handle_envelope_voided(envelope_id, payload)

    # Always return 200 quickly - process asynchronously if needed
    return jsonify({"status": "received"}), 200

def handle_signing_complete(envelope_id, payload):
    """Download signed document, update database, trigger next workflow step."""
    print(f"Envelope {envelope_id} fully signed. Triggering post-signing workflow...")
    # Your business logic here: download PDF, update CRM, send confirmation email

def handle_signing_declined(envelope_id, payload):
    """Notify relevant parties, update status in your system."""
    decline_reason = payload.get('declineReason', 'No reason provided')
    print(f"Envelope {envelope_id} declined. Reason: {decline_reason}")
💡 Webhook Best Practice: Verify Authenticity
DocuSign Connect webhooks can be configured with an HMAC signature that you verify on your server. Always validate the signature header before processing webhook payloads — this prevents malicious actors from spoofing DocuSign events and triggering your workflow with fake data. Enable HMAC verification in your Connect configuration and validate the X-DocuSign-Signature-1 header on every incoming request.
DocuSign API Features Overview
| Feature | Available | Notes |
|---|---|---|
| eSignature (REST) | ✅ | Core API — all plans |
| Embedded Signing | ✅ | In-app iframe signing |
| Templates | ✅ | Reusable envelope configurations |
| Bulk Send | ✅ | Send to 1,000+ signers at once |
| Connect Webhooks | ✅ | Real-time event notifications |
| In-Person Signing | ✅ | Device-based signing |
| SMS Authentication | ✅ | Identity verification for signers |
| ID Verification | ✅ | Government ID checks (add-on) |
| Payments | ✅ | Collect payment at signing |
| PowerForms | ✅ | Self-service signing links |
| AI Contract Analysis | ✅ (Navigator) | Extract data from agreements |
| Clickwrap (Click API) | ✅ | Terms acceptance without signing |
DocuSign API vs. Competing E-Signature APIs
| Criteria | DocuSign API | Adobe Sign API | HelloSign API (Dropbox) | SignNow API |
|---|---|---|---|---|
| Market Position | #1 globally | #2 globally | Strong mid-market | Growing |
| SDK Languages | Python, Node, Java, C#, PHP | Python, Node, Java, PHP | Python, Node, Ruby, PHP | Python, Node, PHP |
| Authentication | OAuth 2.0 (JWT + Auth Code) | OAuth 2.0 | OAuth 2.0 / API Key | OAuth 2.0 / API Key |
| Embedded Signing | ✅ Excellent | ✅ Good | ✅ Good | ✅ Good |
| Webhook Support | ✅ (Connect) | ✅ | ✅ | ✅ |
| Templates via API | ✅ | ✅ | ✅ | ✅ |
| Bulk Send | ✅ (1,000+ recipients) | ✅ | Limited | ✅ |
| Legal Compliance | ✅ eIDAS, ESIGN, UETA | ✅ eIDAS, ESIGN, UETA | ✅ ESIGN, UETA | ✅ ESIGN, UETA |
| EU Advanced Sig. | ✅ | ✅ | ❌ | Limited |
| Developer Experience | ⭐⭐⭐⭐ (4.2/5) | ⭐⭐⭐ (3.8/5) | ⭐⭐⭐⭐⭐ (4.6/5) | ⭐⭐⭐ (3.5/5) |
| Documentation Quality | ⭐⭐⭐⭐ (4.3/5) | ⭐⭐⭐ (3.7/5) | ⭐⭐⭐⭐⭐ (4.7/5) | ⭐⭐⭐ (3.4/5) |
| Pricing (API access) | Premium | Premium | Competitive | Budget-friendly |
| Enterprise Features | ⭐⭐⭐⭐⭐ (5/5) | ⭐⭐⭐⭐⭐ (4.8/5) | ⭐⭐⭐ (3.5/5) | ⭐⭐⭐ (3.3/5) |
Honest assessment:
DocuSign API leads in enterprise features, global legal compliance coverage, and sheer ecosystem maturity. If you’re building for regulated industries — finance, legal, healthcare, real estate — it’s the safest choice.
HelloSign (Dropbox Sign) has a cleaner, more developer-friendly API experience. The authentication is simpler, the documentation is clearer, and pricing is more accessible for smaller applications. If your use case is straightforward and you don’t need DocuSign’s enterprise-grade compliance stack, HelloSign is a genuinely strong alternative.
Adobe Sign makes sense when you’re already embedded in the Adobe or Microsoft enterprise ecosystem — the integrations with Adobe Acrobat and Microsoft 365 are unmatched.
DocuSign API Pricing 2026
DocuSign doesn’t publish API-specific pricing cleanly — API access is bundled into their subscription plans. Here’s the practical breakdown:
| Plan | Monthly Cost | Envelopes Included | API Access | Best For |
|---|---|---|---|---|
| Personal | ~$15/month | 5/month | ❌ No API | Consumer use only |
| Standard | ~$45/user/month | Unlimited | ✅ Basic | Small team integrations |
| Business Pro | ~$65/user/month | Unlimited | ✅ Full | Mid-market applications |
| Enterprise | Custom pricing | Unlimited | ✅ Full + SLAs | High-volume, regulated industries |
| Developer Sandbox | Free | Unlimited (test only) | ✅ Full | Development and testing |
💡 Important: The developer sandbox is completely free and gives you full API access for testing. There is no time limit. Build and test everything there before touching a paid account. Most developers underestimate how long they can stay in sandbox — months of development are entirely free.
For high-volume API usage, DocuSign also offers envelope-based pricing negotiated directly — if you’re sending millions of envelopes per year, the per-envelope cost can drop significantly under a custom enterprise agreement.
Common DocuSign API Mistakes and How to Fix Them
Mistake 1: Using fixed tab coordinates on dynamically generated PDFs
If your PDF content can shift based on data (different text lengths, variable-length tables), fixed X/Y coordinates will place signature fields in the wrong position. Fix: Use anchor text tabs instead, embedding invisible anchor strings like /sign_here/ in your PDF template.
Mistake 2: Not setting clientUserId for embedded signing
Embedded signing requires a clientUserId on the signer — a unique identifier from your system. If you forget to set it when creating the envelope, you can’t generate an embedded signing URL later. Fix: Always set clientUserId on signers you plan to sign in-app, even if you’re not sure yet.
Mistake 3: Generating embedded signing URLs in advance
The signing URL expires in 5 minutes. Generating it on page load and caching it breaks after a few minutes. Fix: Generate the signing URL on-demand, immediately before presenting it to the user.
Mistake 4: Pointing development code at the production environment
New DocuSign developers sometimes accidentally create real envelopes and consume production quota during testing. Fix: Sandbox (account-d.docusign.com / demo.docusign.net) vs. production (account.docusign.com / na3.docusign.net or your assigned base URI) — keep them rigidly separate with environment variables.
Mistake 5: Not handling webhook delivery failures
DocuSign Connect retries failed webhook deliveries, but only a limited number of times. If your endpoint is down for an extended period, you’ll miss events. Fix: Implement a reconciliation job that periodically queries envelope status via the List Envelopes API for any envelopes in a pending state — this catches events missed during downtime.
DocuSign API Integration Checklist
✅ DocuSign API Production Readiness Checklist
Authentication & Security:
- RSA private key stored in secrets manager (not in code or Git)
- Integration Key and User ID stored as environment variables
- JWT token refresh logic implemented (tokens expire after 1 hour)
- Sandbox and production environments strictly separated in config
- Webhook HMAC signature validation implemented
Envelope Configuration:
- Anchor tabs used for dynamic documents (not fixed coordinates)
clientUserIdset on all embedded signers at envelope creationstatus: "created"used for drafts,"sent"only when ready- Email subject and body customized (not DocuSign defaults)
- CC recipients added for relevant stakeholders
Webhooks & Status Tracking:
- Connect webhook configured with HMAC verification
- Webhook handler returns HTTP 200 within 10 seconds
- Asynchronous processing implemented for heavy post-signing tasks
- Reconciliation job exists to catch missed webhook events
- All envelope status changes logged with timestamps
Signed Document Retrieval:
- Completed document download implemented and tested
- Documents stored securely post-signing (encrypted at rest)
- Audit trail (Certificate of Completion) retrieved and stored alongside document
Testing:
- All flows tested end-to-end in sandbox before production deployment
- Decline and void scenarios tested (not just happy path)
- Bulk send tested with small batch before large-scale use
- Embedded signing tested across mobile devices and major browsers
Retrieving Signed Documents: Don’t Forget This Step
After an envelope is completed, you need to retrieve the signed document and store it. This step is surprisingly often forgotten until someone asks “where’s the signed contract?”
def download_signed_document(access_token, account_id, envelope_id, output_path):
    """Download the completed signed document from DocuSign."""

    api_client = ApiClient()
    api_client.host = "https://demo.docusign.net/restapi"
    api_client.set_default_header("Authorization", f"Bearer {access_token}")

    envelopes_api = EnvelopesApi(api_client)

    # Download combined PDF (all documents in one file)
    result = envelopes_api.get_document(
        account_id,
        envelope_id,
        document_id="combined"  # "combined" = all docs merged; use "1", "2" for individual
    )

    with open(output_path, 'wb') as f:
        f.write(result)

    print(f"Signed document saved to {output_path}")

def download_audit_trail(access_token, account_id, envelope_id, output_path):
    """Download the Certificate of Completion (audit trail)."""

    api_client = ApiClient()
    api_client.host = "https://demo.docusign.net/restapi"
    api_client.set_default_header("Authorization", f"Bearer {access_token}")

    envelopes_api = EnvelopesApi(api_client)

    # Document ID "certificate" retrieves the audit trail
    result = envelopes_api.get_document(account_id, envelope_id, document_id="certificate")

    with open(output_path, 'wb') as f:
        f.write(result)
Always retrieve and store both: the signed document and the Certificate of Completion. The certificate is the legally significant audit trail — it logs every action taken (viewed, signed, IP address, timestamp) and is what you’d produce in a legal dispute.
FAQs: DocuSign API
❓ Do I need a paid DocuSign account to use the API?
For development and testing, no. DocuSign provides a completely free developer sandbox with full API access and unlimited test envelopes. For production use with real signatures, you need a paid plan — Standard, Business Pro, or Enterprise — that includes API access.
❓ What programming languages does the DocuSign API support?
DocuSign publishes official SDKs for Python, Node.js, Java, C# (.NET), PHP, and Ruby. You can also make direct REST API calls from any language that supports HTTP — Go, Rust, Kotlin, whatever your stack requires. The REST endpoints work identically regardless of language.
❓ Are DocuSign electronic signatures legally binding?
Yes. DocuSign electronic signatures are legally binding under the U.S. ESIGN Act (2000), UETA, the EU eIDAS Regulation, and equivalent legislation in 180+ countries. DocuSign is one of the most widely accepted e-signature platforms in legal and regulatory contexts globally. For advanced or qualified electronic signatures (required in some EU jurisdictions), DocuSign supports those through additional verification workflows.
❓ How do I test the DocuSign API without sending real emails?
Use the DocuSign sandbox environment (account-d.docusign.com). Envelopes created in sandbox send real emails to real email addresses — but they’re clearly marked as test envelopes and have no legal validity. If you want to prevent any email delivery during testing, use embedded signing (which skips email entirely) or create envelopes with status: "created" (draft, not sent).
❓ What is a DocuSign Connect webhook and how is it different from polling?
DocuSign Connect is DocuSign’s push notification system. Instead of your application repeatedly asking “has this envelope been signed yet?” (polling), DocuSign proactively sends an HTTP POST to your server the moment any envelope event occurs. This is faster, more efficient, and enables real-time workflow automation. Always use Connect webhooks in production — never poll for status.
❓ Can I send the same document to multiple signers in a specific order?
Yes. DocuSign supports sequential signing through routing order. Assign each signer a routing_order value (1, 2, 3…). DocuSign sends to signer 1 first, then signer 2 after signer 1 completes, and so on. You can also configure parallel signing by giving multiple signers the same routing order value.
❓ How do I handle the DocuSign API in a multi-tenant SaaS application?
Each tenant (customer) should ideally have their own DocuSign account, with your application using OAuth Authorization Code Grant to act on their behalf. If you’re sending on behalf of all tenants from a single DocuSign account, use JWT Grant with impersonation and carefully track which envelopes belong to which tenant using your own metadata. Use DocuSign’s custom_fields on envelopes to tag them with your internal tenant/account IDs.
Conclusion: The DocuSign API Is Complex, But Worth Every Bit of It
After building production integrations with the DocuSign API across multiple industries, the honest summary is this: the initial setup is genuinely harder than most developer APIs, but once you’re past it, the platform is rock solid.
The JWT authentication dance, the coordinate-based tab system, the sandbox-vs-production separation — these aren’t arbitrary complications. They exist because DocuSign is handling legally significant transactions that companies and individuals rely on in courts, regulatory filings, and billion-dollar deals. That level of accountability demands rigor in the API design.
What makes the investment worthwhile is the outcome: fully automated agreement workflows that close in minutes, audit trails that satisfy even the most demanding compliance teams, embedded signing experiences that feel native to your product, and webhooks that trigger downstream actions the instant a document is signed.
My practical starting recommendations:
- Get comfortable in the sandbox before touching production. Build every workflow there first.
- Use templates for any document type you send more than once. The time saved is enormous.
- Implement webhooks from day one — don’t add them later as an afterthought.
- Store anchor strings in your PDFs for any document where content length varies.
- Always retrieve and store the signed document AND the Certificate of Completion immediately after an envelope completes.
The DocuSign API is not the easiest integration you’ll ever build, but it’s one of the most impactful. When it’s running smoothly in production — envelopes flowing through automatically, signed documents landing in your storage, webhooks firing like clockwork — there’s a particular satisfaction in knowing you’ve built something that genuinely saves people time and eliminates friction from processes that used to take days.
That’s worth the learning curve.
Sources: DocuSign Developer Documentation | DocuSign Company Overview | DocuSign eSignature REST API Reference